python單元測試框架pytest的使用示例
首先祝大家國慶節日快樂,這個假期因為我老婆要考注會,我也跟著天天去圖書館學了幾天,學習的感覺還是非常不錯的,這是一篇總結。
這篇博客準備講解一下pytest測試框架,這個框架是當前最流行的python語言最流行的單測框架,不掌握可不行,首先這個框架屬于第三方模塊,需要通過pip安裝即可
pip install pytest
下面我們進入正題
一、介紹pytest的運行規則
1、測試文件的名稱必須要以test_*.py的格式,或者*_test.py的格式
2、測試類的名稱必須要以Test開頭,且這個類還不能有構造方法(__init__)
3、測試函數的名稱必須要以test開頭
pytest默認的就按照上面的三條規則來執行案例,當然我們可以自定義運行規則,這個我們后面在講,這個不重要,看一個最簡單的例子
import osimport pytest # pytest是python的單元測試框架 def func(x): return x + 1 def test_a(): print('____test_a____') assert func(2) == 5 def test_b(): print('____test_b____') assert func(2) == 3 if __name__ == ’__main__’: pytest.main(['-s','pytest1.py'])
二、介紹pytest的前置條件和后置條件,類似unittest的testfixture(測試固件)
如果同學們之前用過unittest測試框架,對測試固件這個這個名詞就不會陌生了,如果不清楚,可以看下之前我寫的unittest測試框架的博客(https://www.jb51.net/article/197004.htm)
pytest框架的測試固件有兩種,一種函數級別的,一種是類級別,執行的順序如下
a、執行類的前置條件
b、執行函數的前置條件
c、執行函數的后置條件
d、執行類的后置條件
使用也非常簡單,當時函數的命名一定要和我下面的備注保持完全一致
# pytest的前置和后置條件 # 1、函數級別 setup teardown# 運行于測試方法的開始和結束# 運行一個測試用例,會運行一次setup和teardown # 2、類級 setup_class teardown_class# 運行于測試類的開始和結束# 一個測試類只運行一次setup_class teardown_class
1、函數式的案例--函數級別的前置條件&后置條件
import osimport pytest def func(x): return x + 1 def test_a(): print('____test_a____') assert func(2) == 5 def test_b(): print('____test_b____') assert func(2) == 3 def setup(): print('函數級別的前置') def teardown(): print('函數級別的后置')
執行結果如下

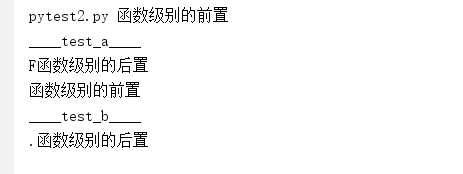
2、類式的案例--函數級別的前置條件&后置條件
class Testclass: def test_a(self): print('____test_a____') assert func(2) == 5 def test_b(self): print('____test_b____') assert func(2) == 3 def setup(self): print('函數級別的前置') def teardown(self): print('函數級別的后置')if __name__ == ’__main__’: pytest.main(['-s','pytest2.py'])
執行結果如下
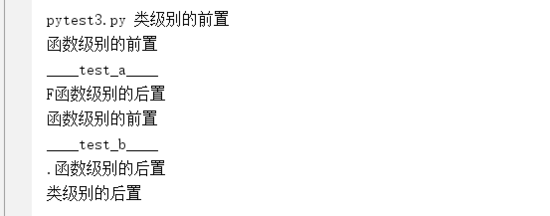
3、類級別的前置條件&后臺置條件
import pytest def func(x): return x + 1 class Testclass: def test_a(self): print('____test_a____') assert func(2) == 5 def test_b(self): print('____test_b____') assert func(2) == 3 def setup(self): print('函數級別的前置') def teardown(self): print('函數級別的后置') def setup_class(self): print('類級別的前置') def teardown_class(self): print('類級別的后置')if __name__ == ’__main__’: pytest.main(['-s','pytest3.py'])
結果如下
三、介紹如何修改pytest的配置文件
我們在博客的第一部分介紹了pytest框架的運行規則,這里我們可以修改pytest的配置文件,改變框架運行規則
首先我們要在案例的目錄下創建一個pytest.ini的配置文件
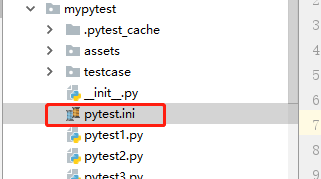
內容如下
# 創建pytest.ini文件# [pytest]# addopts=-s#這個先這樣寫,這個主要是執行參數 # testpaths = testcase# 只執行這個目錄下的文件## python_files = test_*.py#執行的文件的名字 # python_classes = Test_*#執行類的名字 # python_functions = test_*# 執行函數的名字
配置文件截圖

通過上面的步驟,我們就可以改變pytest的運行規則
四、介紹pytest的斷言
pytest的斷言是用python的斷言,他不像unittest框架,他自己實現了斷言
# -*- coding:utf-8 -*- # pytest是使用python自帶的斷言import pytest def func(x): return x + 1 def test_a(): print('____test_a____') assert func(2) == 5 def test_b(): print('____test_b____') assert not func(2) == 3 def test_c(): print('____test_b____') assert func(2) in ['a','b','c'] def test_d(): print('____test_b____') assert func(2) not in ['a','b','c'] if __name__ == ’__main__’: pytest.main(['-s','pytest5.py'])
五、介紹pytest的標記(mark)
1、可以實現給函數打標記,實現哪些標記執行,哪些標記不執行
一個函數可以打多個標記,一個標記同時可以給多個函數打標記。只需要讓這個標記的裝飾器函數裝飾我們的測試類或者測試函數
class Test_mark(): @pytest.mark.test01 def test_a(self): print('mark test a') @pytest.mark.test02 def test_b(self): print('mark test b') if __name__ == ’__main__’: pytest.main([’-s’,'pytest6.py'])
還有其它的執行方式
# pytest -m test01 # pytest -n 'test01 or test02' # pytest -m 'not test01'
2、標記可以實現不跳過某個、某些案例的作用
# -*- coding:utf-8 -*- import pytest # skip跳過執行某個案例@pytest.mark.skip(reson='只是這個函數用例不執行')def test_a(): print('testa') def test_b(): print('testb') @pytest.mark.skip(reson='整個類下的案例都不會執行')class Test_skip(): def test_a(self): print('testa') def test_b(self): print('testb') # 可以根據條件判斷,為真,則不執行@pytest.mark.skipif(1 > 2,reson='整個類下的案例滿足條件都不會執行')class Test_skipif(): def test_a(self): print('testa') def test_b(self): print('testb')
六、介紹pytest的數據參數化
1、傳入單個參數
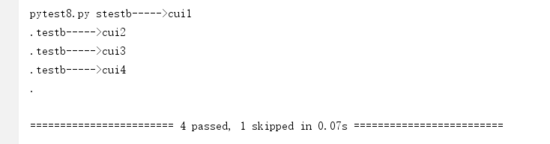
# pytest的數據參數化 # 1、傳入單個參數## pytest.mark.parametrize(argnames,argvalues)# argnames 參數的名稱## argvalues 參數對應的值,類型必須是可迭代的類型,一般使用list @pytest.mark.skip(reson='只是這個函數用例不執行')def test_a(): print('testa') @pytest.mark.parametrize('name',['cui1','cui2','cui3','cui4'])def test_b(name): print('testb----->{name}'.format(name = name)) if __name__ == ’__main__’: pytest.main(['-s', 'pytest8.py'])
實現的效果name作為參數的名稱,這個案例會執行4次,參數分別是name=“cui1”name='cui2'....
2、傳入多個參數
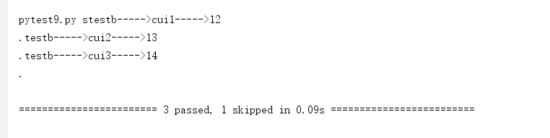
import pytest # pytest的數據參數化 # 1、傳入多個參數## pytest.mark.parametrize((argnames1,argnames2),[(argvalues1,argvalues1),(argvalues1,argvalues1)],(argvalues1,argvalues1)]]) @pytest.mark.skip(reson='只是這個函數用例不執行')def test_a(): print('testa') @pytest.mark.parametrize(('name','age'),[('cui1',12),('cui2',13),('cui3',14)])def test_b(name,age): print('testb----->{name}----->{age}'.format(name = name,age = age)) if __name__ == ’__main__’: pytest.main(['-s', 'pytest9.py'])
實現的效果如下
七、介紹pyest的常用第三方插件
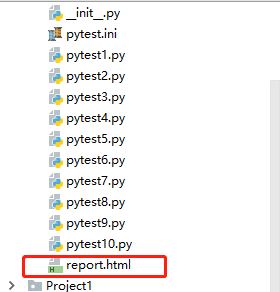
1、美化pytest的輸出報告插件
# pip install pytest-html # 用來美化輸出報告的插件# 只需要在配置文件中加這個配置即可## addopts=-s --html=report.html
效果
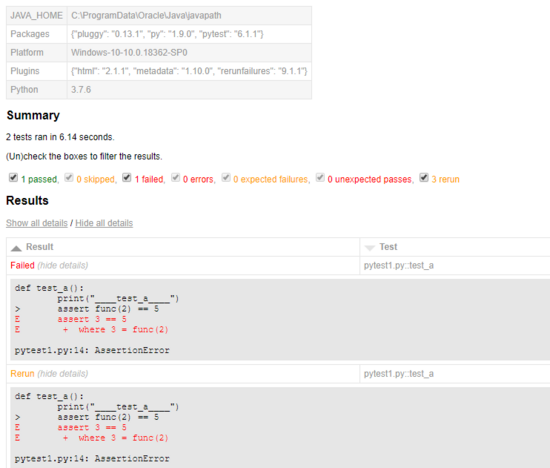
2、失敗案例重試插件,下面的示例實現的就是失敗重啟3,失敗后間隔2s在進行重試
# pip install pytest-rerunfailures# 失敗重試的第三方插件# 只需要在配置文件中加這個配置即# --reruns 3 --reruns-delay 2
至此,pytest的框架基本使用已經講解清楚,小伙伴們還有不清楚的嗎?歡迎大家來溝通!!!
到此這篇關于python單元測試框架pytest的使用示例的文章就介紹到這了,更多相關python單元測試框架pytest內容請搜索好吧啦網以前的文章或繼續瀏覽下面的相關文章希望大家以后多多支持好吧啦網!
相關文章:

 網公網安備
網公網安備