ELK收集Tomcat日志的實(shí)現(xiàn)
目錄
- 01 Tomcat 安裝與測(cè)試
- 02 修改 Tomcat 日志為 Json 格式
- 03 配置 Filebeat 采集 Tomcat 日志
- 04 使用Kibana查看Tomcat日志
01 Tomcat 安裝與測(cè)試
1.1 安裝 Tomcat
安裝Tomcat的本體和相關(guān)官方測(cè)試demo,參考鏈接
apt-get install tomcat8 -y # 安裝Tomcat本體apt-get install tomcat8-docs tomcat8-examples tomcat8-admin -y # 安裝測(cè)試demo
1.2 Tomcat 啟動(dòng)檢查
systemctl start tomcat8 # 啟動(dòng)Tomcatsystemctl status tomcat8netstat -lntup|grep 8080 # 端口測(cè)試lsof -i:8080# 端口檢查得到輸出COMMAND PID USER FD TYPE DEVICE SIZE/OFF NODE NAMEjava 4502 tomcat8 63u IPv6 125026 0t0 TCP *:http-alt (LISTEN)
1.3 查看 Tomcat 日志
啟動(dòng)tomcat之后,使用本地瀏覽器訪問(wèn)http://localhost:8080/訪問(wèn)tomcat頁(yè)面,在頁(yè)面中點(diǎn)擊按鈕產(chǎn)生HTTP請(qǐng)求,讓tomcat產(chǎn)生日志
tail -f /var/log/tomcat8/localhost_access_log.2021-08-01.txt
02 修改 Tomcat 日志為 Json 格式
打開Tomcat的server.xml配置文件進(jìn)行修改,在日志文件中的文末修改如下對(duì)應(yīng)設(shè)置
# 編輯配置文件vim /etc/tomcat8/server.xml#將以下內(nèi)容替換配置文件中135行對(duì)應(yīng)內(nèi)容<Valve className="org.apache.catalina.valves.AccessLogValve" directory="logs" prefix="localhost_access_log" suffix=".log" pattern="{"client":"%h", "client user":"%l", "authenticated":"%u", "access time":"%t", "method":"%r", "status":"%s", "send bytes":"%b", "Query?string":"%q", "partner":"%{Referer}i", "Agent version":"%{User-Agent}i"}"/># 查看修改內(nèi)容cat -n /etc/tomcat8/server.xml重新啟動(dòng)tomcat并查看日志,檢驗(yàn)是否配置成功,產(chǎn)生新的日志還是需要通過(guò)使用瀏覽器訪問(wèn)8080端口,在Tomcat的demo樣例中對(duì)tomcat發(fā)送請(qǐng)求產(chǎn)生日志。
# 先清空日志> /var/log/tomcat8/localhost_access_log.2021-08-02.txt # 重新啟動(dòng)Tomcatsystemctl restart tomcat8# 查看日志root@master:/var/log/tomcat8# tail -f /var/log/tomcat8/localhost_access_log.2021-08-02.log # 查看日志命令{"client":"172.16.255.1", "client user":"-", "authenticated":"-", "access time":"[02/Aug/2021:02:23:55 +0000]", "method":"GET /examples/servlets/images/return.gif HTTP/1.1", "status":"200", "send bytes":"1231", "Query?string":"", "partner":"http://172.16.255.131:8080/examples/servlets/", "Agent version":"Mozilla/5.0 (X11; Linux x86_64) AppleWebKit/537.36 (KHTML, like Gecko) Chrome/92.0.4515.107 Safari/537.36"}{"client":"172.16.255.1", "client user":"-", "authenticated":"-", "access time":"[02/Aug/2021:02:23:57 +0000]", "method":"GET /examples/servlets/servlet/RequestParamExample HTTP/1.1", "status":"200", "send bytes":"673", "Query?string":"", "partner":"http://172.16.255.131:8080/examples/servlets/", "Agent version":"Mozilla/5.0 (X11; Linux x86_64) AppleWebKit/537.36 (KHTML, like Gecko) Chrome/92.0.4515.107 Safari/537.36"}{"client":"172.16.255.1", "client user":"-", "authenticated":"-", "access time":"[02/Aug/2021:02:24:01 +0000]", "method":"GET /host-manager/html HTTP/1.1", "status":"401", "send bytes":"2044", "Query?string":"", "partner":"http://172.16.255.131:8080/", "Agent version":"Mozilla/5.0 (X11; Linux x86_64) AppleWebKit/537.36 (KHTML, like Gecko) Chrome/92.0.4515.107 Safari/537.36"}03 配置 Filebeat 采集 Tomcat 日志
新增Filebeat輸入配置,將tomcat日志參照Nginx的Json格式日志采集方式配置如下
vim小技巧:將連續(xù)多行內(nèi)容復(fù)制對(duì)應(yīng)位置使用t命令,在Normal模式中輸入:2,7t11表示將第二到第七行的內(nèi)容復(fù)制到第十一行開頭;將連續(xù)多行內(nèi)容移動(dòng)對(duì)應(yīng)位置使用m命令,在Normal模式中輸入:2,7m11表示將第二到第七行的內(nèi)容移動(dòng)到第十一行開頭
vim小技巧:在輸入內(nèi)容時(shí)要使用到某個(gè)文件路徑可以是用!命令然后使用shell命令查看內(nèi)容,例如查看某個(gè)文件的路徑可以在Normal模式中輸入:!ls /var/log/tomcat8/...提示
# ================== Filebeat inputs ===============# ------------------------------Tomcat----------------------------------- type: log enabled: true paths: # - /var/log/tomcat8/localhost_access_log.2021-08-02.log # 為了能夠采集所有日期的日志,將文件名中的指定日期改成通配符`*` - /var/log/tomcat8/localhost_access_log.*.log json.keys_under_root: true json.overwrite_keys: true tags: ["tomcat"]# ================================== Outputs ===================================# ---------------------------- Elasticsearch Output ----------------------------output.elasticsearch: hosts: ["172.16.255.131:9200"] indices: - index: "nginx-access-%{[agent.version]}-%{+yyyy.MM}"when.contains: tags: "access" - index: "nginx-error-%{[agent.version]}-%{+yyyy.MM}"when.contains: tags: "error"# 在輸出配置中添加如下索引設(shè)置識(shí)別tomcat日志,值得注意的時(shí)這里不需要再重新編輯template設(shè)置,應(yīng)該pattern配置只在第一次使用時(shí)進(jìn)行匹配識(shí)別 - index: "tomcat-access-%{[agent.version]}-%{+yyyy.MM}"when.contains: tags: "tomcat"04 使用Kibana查看Tomcat日志
配置完成之后,重新啟動(dòng)Filebeat采集Json格式日志
systemctl restart filebeat
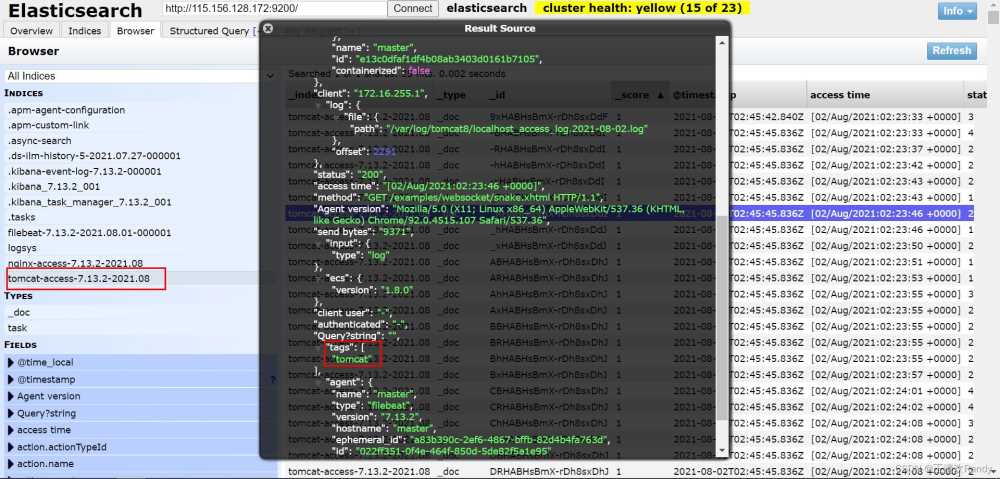
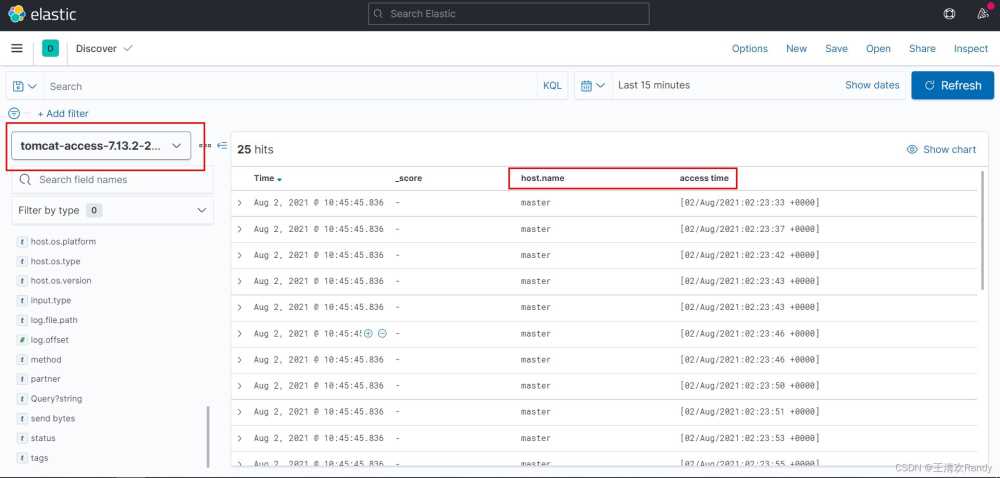
查看ES中存儲(chǔ)的Tomcat日志是否是Json格式
到此這篇關(guān)于ELK收集Tomcat日志的實(shí)現(xiàn)的文章就介紹到這了,更多相關(guān)ELK Tomcat日志內(nèi)容請(qǐng)搜索以前的文章或繼續(xù)瀏覽下面的相關(guān)文章希望大家以后多多支持!
相關(guān)文章:

 網(wǎng)公網(wǎng)安備