win101803更新升級(jí)1909錯(cuò)誤代碼x80004005怎么辦
我們在使用win10操作系統(tǒng)的時(shí)候,有些情況下可能需要升級(jí)我們的操作系統(tǒng)。有的小伙伴可能就會(huì)遇到win101803操作系統(tǒng)升級(jí)更新1909系統(tǒng)的時(shí)候出現(xiàn)了錯(cuò)誤,并且系統(tǒng)提示錯(cuò)誤代碼x80004005的情況。小編覺得我們可以嘗試在命令提示符窗口使用相關(guān)代碼來進(jìn)行修復(fù)等等。那么具體解決步驟就來看看小編是怎么做的吧~

【win101909常見問題匯總】
win101803更新升級(jí)1909錯(cuò)誤代碼x80004005怎么辦方法一:
手動(dòng)注冊Windows Update組件:
1. 同時(shí)按【W(wǎng)in+X】鍵,點(diǎn)選【W(wǎng)indows PowerShell(管理員)】
2. 拷貝下方的程序碼到剛打開的PowerShell里面,按回車
3. 忽略紅字錯(cuò)誤,重啟電腦
4. 運(yùn)行Windows Update
$arch = Get-WMIObject -Class Win32_Processor -ComputerName LocalHost | Select-Object AddressWidth
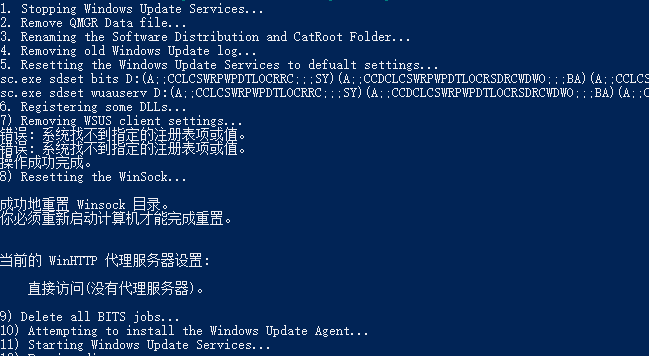
Write-Host '1. Stopping Windows Update Services...'
Stop-Service -Name BITS
Stop-Service -Name wuauserv
Stop-Service -Name appidsvc
Stop-Service -Name cryptsvc
Write-Host '2. Remove QMGR Data file...'
Remove-Item '$env:allusersprofileApplication DataMicrosoftNetworkDownloaderqmgr*.dat' -ErrorAction SilentlyContinue
Write-Host '3. Renaming the Software Distribution and CatRoot Folder...'
Rename-Item $env:systemrootSoftwareDistribution SoftwareDistribution.bak -ErrorAction SilentlyContinue
Rename-Item $env:systemrootSystem32Catroot2 catroot2.bak -ErrorAction SilentlyContinue
Write-Host '4. Removing old Windows Update log...'
Remove-Item $env:systemrootWindowsUpdate.log -ErrorAction SilentlyContinue
Write-Host '5. Resetting the Windows Update Services to defualt settings...'
'sc.exe sdset bits D:(A;;CCLCSWRPWPDTLOCRRC;;;SY)(A;;CCDCLCSWRPWPDTLOCRSDRCWDWO;;;BA)(A;;CCLCSWLOCRRC;;;AU)(A;;CCLCSWRPWPDTLOCRRC;;;PU)'
'sc.exe sdset wuauserv D:(A;;CCLCSWRPWPDTLOCRRC;;;SY)(A;;CCDCLCSWRPWPDTLOCRSDRCWDWO;;;BA)(A;;CCLCSWLOCRRC;;;AU)(A;;CCLCSWRPWPDTLOCRRC;;;PU)'
Set-Location $env:systemrootsystem32
Write-Host '6. Registering some DLLs...'
regsvr32.exe /s atl.dll
regsvr32.exe /s urlmon.dll
regsvr32.exe /s mshtml.dll
regsvr32.exe /s shdocvw.dll
regsvr32.exe /s browseui.dll
regsvr32.exe /s jscript.dll
regsvr32.exe /s vbscript.dll
regsvr32.exe /s scrrun.dll
regsvr32.exe /s msxml.dll
regsvr32.exe /s msxml3.dll
regsvr32.exe /s msxml6.dll
regsvr32.exe /s actxprxy.dll
regsvr32.exe /s softpub.dll
regsvr32.exe /s wintrust.dll
regsvr32.exe /s dssenh.dll
regsvr32.exe /s rsaenh.dll
regsvr32.exe /s gpkcsp.dll
regsvr32.exe /s sccbase.dll
regsvr32.exe /s slbcsp.dll
regsvr32.exe /s cryptdlg.dll
regsvr32.exe /s oleaut32.dll
regsvr32.exe /s ole32.dll
regsvr32.exe /s shell32.dll
regsvr32.exe /s initpki.dll
regsvr32.exe /s wuapi.dll
regsvr32.exe /s wuaueng.dll
regsvr32.exe /s wuaueng1.dll
regsvr32.exe /s wucltui.dll
regsvr32.exe /s wups.dll
regsvr32.exe /s wups2.dll
regsvr32.exe /s wuweb.dll
regsvr32.exe /s qmgr.dll
regsvr32.exe /s qmgrprxy.dll
regsvr32.exe /s wucltux.dll
regsvr32.exe /s muweb.dll
regsvr32.exe /s wuwebv.dll
Write-Host '7) Removing WSUS client settings...'
REG DELETE 'HKLMSOFTWAREMicrosoftWindowsCurrentVersionWindowsUpdate' /v AccountDomainSid /f
REG DELETE 'HKLMSOFTWAREMicrosoftWindowsCurrentVersionWindowsUpdate' /v PingID /f
REG DELETE 'HKLMSOFTWAREMicrosoftWindowsCurrentVersionWindowsUpdate' /v SusClientId /f
Write-Host '8) Resetting the WinSock...'
netsh winsock reset
netsh winhttp reset proxy
Write-Host '9) Delete all BITS jobs...'
Get-BitsTransfer | Remove-BitsTransfer
Write-Host '10) Attempting to install the Windows Update Agent...'
if($arch -eq 64){
wusa Windows8-RT-KB2937636-x64 /quiet
}
else{
wusa Windows8-RT-KB2937636-x86 /quiet
}
Write-Host '11) Starting Windows Update Services...'
Start-Service -Name BITS
Start-Service -Name wuauserv
Start-Service -Name appidsvc
Start-Service -Name cryptsvc
Write-Host '12) Forcing discovery...'
wuauclt /resetauthorization /detectnow
Write-Host 'Process complete. Please reboot your computer.'
方法二:
重裝系統(tǒng)
1.好吧啦網(wǎng)下載的操作系統(tǒng)不需要復(fù)雜的步驟,直接使用傻瓜式裝機(jī),上手簡單。
2.好吧啦網(wǎng)的系統(tǒng)安全穩(wěn)定、綠色流暢,可以在系統(tǒng)家園下載我們需要的操作系統(tǒng):
>>>臺(tái)式機(jī)win10 64位系統(tǒng)下載<<<
>>>臺(tái)式機(jī)win10 32位系統(tǒng)下載<<<
>>>筆記本win10 64位系統(tǒng)下載<<<
>>>筆記本win10 32位系統(tǒng)下載<<<
>>>好吧啦網(wǎng)地址<<<
>>>win10系統(tǒng)安裝教程<<<
安裝步驟:
1.在文件夾中,找到你下載好的win10系統(tǒng),鼠標(biāo)右鍵該系統(tǒng)文件,選擇【裝載】。

2.然后會(huì)彈出一個(gè)文件夾,我們直接鼠標(biāo)雙擊【一鍵安裝系統(tǒng)】就行了。

3.假如出現(xiàn)有報(bào)毒或者其它提示的情況,請執(zhí)行以下步驟,如果沒有,略過3-5步驟。
以上就是小編給各位小伙伴帶來的win101803更新升級(jí)1909錯(cuò)誤代碼x80004005怎么辦的所有內(nèi)容,希望你們會(huì)喜歡。更多相關(guān)教程請收藏好吧啦網(wǎng)~
以上就是win101803更新升級(jí)1909錯(cuò)誤代碼x80004005怎么辦的全部內(nèi)容,望能這篇win101803更新升級(jí)1909錯(cuò)誤代碼x80004005怎么辦可以幫助您解決問題,能夠解決大家的實(shí)際問題是好吧啦網(wǎng)一直努力的方向和目標(biāo)。
相關(guān)文章:
1. Debian圖標(biāo)怎么橫向排列? Debian11 Xfce橫排桌面圖標(biāo)的技巧2. 蘋果 macOS 11.7.3 更新導(dǎo)致 Safari 收藏夾圖標(biāo)無法正常顯示3. Win11桌面自動(dòng)刷新怎么辦?Win11桌面自動(dòng)刷新的解決方法4. 怎么在Windows10中為應(yīng)用程序設(shè)置CPU進(jìn)程優(yōu)先級(jí)Windows?5. Win7系統(tǒng)如何解決telnet不是內(nèi)部或外部命令?6. Win11將減少磁盤占用 功能可以按需加載7. FreeBSD10安裝內(nèi)核源代碼方法講解8. Windows Event Log服務(wù)能否關(guān)閉?Win10系統(tǒng)Windows Event Log服務(wù)詳解9. freebsd 服務(wù)器 ARP綁定腳本10. Windows 注冊表LastKey鍵值的設(shè)置技巧
 網(wǎng)公網(wǎng)安備