Python基于pyecharts實現(xiàn)關聯(lián)圖繪制
生活中有很多需要用到關聯(lián)圖的地方,至少我認為的是這樣的圖:https://www.echartsjs.com/examples/zh/editor.html?c=graph-npm

我是在使用Word2Vec計算關聯(lián)詞的余弦距離之后,想要更好的展示出來的時候,遇到的這種情況,就做了下拓展。
畫圖的步驟主要分為:
1. 將距離數(shù)據(jù)(或者相關數(shù)據(jù))讀入;
2. 按照一定的格式和參數(shù)將數(shù)據(jù)保存為json字符串;
3. 根據(jù)json串,繪制關聯(lián)圖。
具體而言,主要是:
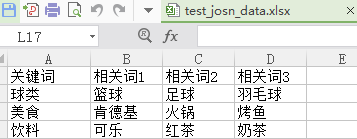
<1>. 首先有一批數(shù)據(jù),如圖所示:
<2>. 導入所需要的包
import jsonimport pandas as pdimport randomimport copy
<3>. 產(chǎn)生顏色隨機值的函數(shù)
# 隨機顏色def randomcolor_func(): color_char = [’1’,’2’,’3’,’4’,’5’,’6’,’7’,’8’,’9’,’A’,’B’,’C’,’D’,’E’,’F’] color_code = '' for i in range(6): color_code += color_char[random.randint(0,14)] # randint包括前后節(jié)點0和14 return '#'+color_code
<4>. 生成隨機坐標
# 隨機坐標#生成隨機數(shù),浮點類型def generate_position(n):# n = 10 for i in range(n): x = round(random.uniform(-2000, 2000), 5) #一定范圍內(nèi)的隨機數(shù),范圍可變 y = round(random.uniform(-2000, 2000), 5) #控制隨機數(shù)的精度round(數(shù)值,精度) return x, y
<5>. 生成json格式的節(jié)點數(shù)據(jù)
def create_json(data, weights): # 自定義節(jié)點 address_dict = {'nodes':[], 'edges':[]} node_dict = { 'color': '', 'label': '', 'attributes': {}, 'y': None, 'x': None, 'id': '', 'size': None } edge_dict = { 'sourceID': '', 'attributes': {}, 'targetID': '', 'size': None } # 給節(jié)點賦值 for ii in range(len(data)): for jj in range(len(data.iloc[ii])): # node,'attributes'屬性可自行設置 node_dict[r'color'] = randomcolor_func() node_dict[r'label'] = data.iloc[ii, jj] x, y = generate_position(1) node_dict[r'y'] = y node_dict[r'x'] = x node_dict[r'id'] = data.iloc[ii, jj] node_dict[r'size'] = int(weights.loc[data.iloc[ii, jj]]) tmp_node = copy.deepcopy(node_dict) address_dict[r'nodes'].append(tmp_node)for ii in range(len(data)): for jj in range(1, len(data.iloc[ii])): # edge edge_dict[r'sourceID'] = data.iloc[ii, 0] edge_dict[r'targetID'] = data.iloc[ii, jj] edge_dict[r'size'] = 2 tmp_edge = copy.deepcopy(edge_dict) address_dict['edges'].append(tmp_edge) return address_dict
<6>. 主函數(shù)生成json數(shù)據(jù)
if __name__ == ’__main__’: # read data data = pd.read_excel(r’test_josn_data.xlsx’, 0) weights = pd.DataFrame({'詞頻':[100, 40, 30, 20, 90, 50, 35, 14, 85, 38, 29, 10]}, index = [’球類’,’籃球’,’足球’,’羽毛球’,’美食’,’肯德基’,’火鍋’,’烤魚’,’飲料’,’可樂’,’紅茶’,’奶茶’]) #建立索引權值列表 address_dict = create_json(data, weights) with open('write_json.json', 'w', encoding=’utf-8’) as f: # json.dump(dict_, f) # 寫為一行 json.dump(address_dict, f, indent=2, ensure_ascii=False) # 寫為多行
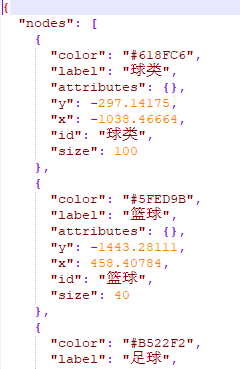
最后形成的json數(shù)據(jù)如下:
<7>. 繪制關聯(lián)圖,里面的文件讀取和保存地址自行修改,write_json.json 就是上面保存的json文件
import pyecharts.options as optsfrom pyecharts.charts import Graphimport jsonwith open(r'D:Python_workspacespyder_spacetest_各種功能write_json.json', encoding=’utf-8’) as f: #設置以utf-8解碼模式讀取文件,encoding參數(shù)必須設置,否則默認以gbk模式讀取文件,當文件中包含中文時,會報錯 data = json.load(f)#print(data)nodes = [ { 'x': node['x'], 'y': node['y'], 'id': node['id'], 'name': node['label'], 'symbolSize': node['size'], 'itemStyle': {'normal': {'color': node['color']}}, } for node in data['nodes']]edges = [{'source': edge['sourceID'], 'target': edge['targetID']} for edge in data['edges']]( Graph(init_opts=opts.InitOpts(width='1600px', height='800px')) .add( series_name='', nodes=nodes, links=edges, layout='none', is_roam=True, is_focusnode=True, label_opts=opts.LabelOpts(is_show=True), linestyle_opts=opts.LineStyleOpts(width=0.5, curve=0.3, opacity=0.7), ) .set_global_opts(title_opts=opts.TitleOpts(title='熱詞對應的關聯(lián)詞')) .render('關聯(lián)詞圖.html'))
最后,就生成了最開始的那張圖。
以上就是本文的全部內(nèi)容,希望對大家的學習有所幫助,也希望大家多多支持好吧啦網(wǎng)。
相關文章:
1. 在JSP頁面中動態(tài)生成圖片驗證碼的方法實例2. 小技巧處理div內(nèi)容溢出3. 如何用JS WebSocket實現(xiàn)簡單聊天4. CSS3使用過度動畫和緩動效果案例講解5. 怎樣才能用js生成xmldom對象,并且在firefox中也實現(xiàn)xml數(shù)據(jù)島?6. Python使用sql語句對mysql數(shù)據(jù)庫多條件模糊查詢的思路詳解7. 小區(qū)后臺管理系統(tǒng)項目前端html頁面模板實現(xiàn)示例8. AJAX的跨域問題解決方案9. Net core中使用System.Drawing對上傳的圖片流進行壓縮(示例代碼)10. Ajax實現(xiàn)局部刷新的方法實例
 網(wǎng)公網(wǎng)安備