詳解java代碼中init method和destroy method的三種使用方式
在java的實(shí)際開(kāi)發(fā)過(guò)程中,我們可能常常需要使用到init method和destroy method,比如初始化一個(gè)對(duì)象(bean)后立即初始化(加載)一些數(shù)據(jù),在銷(xiāo)毀一個(gè)對(duì)象之前進(jìn)行垃圾回收等等。
周末對(duì)這兩個(gè)方法進(jìn)行了一點(diǎn)學(xué)習(xí)和整理,倒也不是專(zhuān)門(mén)為了這兩個(gè)方法,而是在鞏固spring相關(guān)知識(shí)的時(shí)候提到了,然后感覺(jué)自己并不是很熟悉這個(gè),便好好的了解一下。
根據(jù)特意的去了解后,發(fā)現(xiàn)實(shí)際上可以有三種方式來(lái)實(shí)現(xiàn)init method和destroy method。
要用這兩個(gè)方法,自然先要知道這兩個(gè)方法究竟是干嘛用的。而從字面意思就很容易理解,一個(gè)是加載,一個(gè)是銷(xiāo)毀。 下邊就正式代碼演示三種創(chuàng)建方式:
一、@Bean注解方式:
首先要?jiǎng)?chuàng)建一個(gè)至少擁有兩個(gè)方法的類(lèi),一個(gè)方法充當(dāng)init method,另一個(gè)充當(dāng)destroy method。
package springTest2;public class Test1 { public void init() { System.out.println('this is init method1'); } public Test1() { super(); System.out.println('構(gòu)造函數(shù)1'); } public void destroy() { System.out.println('this is destroy method1'); }}
這里很顯然只是一個(gè)普通的java類(lèi),擁有一個(gè)無(wú)參構(gòu)造和另外兩個(gè)方法。
需要注意的是,這里的init和destroy兩個(gè)方法名實(shí)際上是可以隨意取得,不叫這個(gè)也沒(méi)有問(wèn)題,只不過(guò)算是一種約定俗稱(chēng),一般都是這樣叫。
另外我們也知道,這個(gè)構(gòu)造方法也是可以不要的,因?yàn)闀?huì)隱式的自動(dòng)創(chuàng)建,但是為了更清楚的看到init和destroy是什么時(shí)候執(zhí)行,我們就顯示的寫(xiě)出來(lái)。
創(chuàng)建好了這個(gè)類(lèi),我們就可以使用@Bean注解的方式指定兩個(gè)方法,以讓他們生效。
package springTest2;import org.springframework.context.annotation.Bean;import org.springframework.context.annotation.ComponentScan;import org.springframework.context.annotation.Configuration;@Configuration@ComponentScan('springTest2')public class ConfigTest { @Bean(initMethod = 'init', destroyMethod = 'destroy') Test1 test1() { return new Test1(); }}
這里邊的@Configguration注解是告訴spring這個(gè)類(lèi)是一個(gè)配置類(lèi),相當(dāng)于我們的xml文件,@ComponentScan則是指定需要spring來(lái)掃描的包,相當(dāng)于xml中的context:component-scan屬性。
而@Bean后邊的initMethod和destroyMethod就是在聲明這是一個(gè)baen的同時(shí)指定了init和destroy方法,方法名從功能實(shí)現(xiàn)上來(lái)說(shuō)可以隨意。
到這里我們就已經(jīng)用第一種方式寫(xiě)好了,為了驗(yàn)證成功與否,再寫(xiě)一個(gè)main方法驗(yàn)證一下:
package springTest2;import org.springframework.context.annotation.AnnotationConfigApplicationContext;public class MainTest { public static void main(String[] args) { AnnotationConfigApplicationContext context = new AnnotationConfigApplicationContext(ConfigTest.class);System.out.println('#################################'); context.close(); }}
運(yùn)行之后結(jié)果如圖:
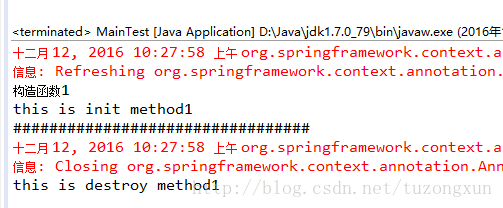
根據(jù)打印順序可以看到,首先是構(gòu)造函數(shù),也就是創(chuàng)建了bean,緊接著執(zhí)行了init,然后再context.close要銷(xiāo)毀bean之前又執(zhí)行了destroy。
二、JSR-250注解的方式(需要導(dǎo)入jsr250-api的jar包):
首先依然是創(chuàng)建一個(gè)擁有構(gòu)造方法在內(nèi)的三個(gè)方法的java類(lèi):
package springTest2;import javax.annotation.PostConstruct;import javax.annotation.PreDestroy;public class Test2 { @PostConstruct public void init() { System.out.println('this is init method2'); } public Test2() { super(); System.out.println('構(gòu)造函數(shù)2'); } @PreDestroy public void destroy() { System.out.println('this is destroy method2'); }}
很顯然,這里和上一個(gè)類(lèi)不同的是,在init和destroy方法上加入了兩個(gè)注解,@PostConstruct和上邊@Bean后的initMethod相同,而@PreDestroy則是和destroyMethod做用相同。 既然這里有了區(qū)別,已經(jīng)指定了init method和destroy method,那么后邊聲明bean的時(shí)候自然也會(huì)有不同,也就不需要再指定一遍:
package springTest2;import org.springframework.context.annotation.Bean;import org.springframework.context.annotation.ComponentScan;import org.springframework.context.annotation.Configuration;@Configuration@ComponentScan('springTest2')public class ConfigTest { @Bean Test2 test2() { return new Test2(); }}
所以,如上代碼中只需要簡(jiǎn)單的聲明這是一個(gè)bean就可以了,類(lèi)上邊的兩個(gè)注解和上一個(gè)例子中的意思相同。 再測(cè)試一下:
package springTest2;import org.springframework.context.annotation.AnnotationConfigApplicationContext;public class MainTest { public static void main(String[] args) { AnnotationConfigApplicationContext context = new AnnotationConfigApplicationContext(ConfigTest.class);System.out.println('#################################'); context.close(); }}
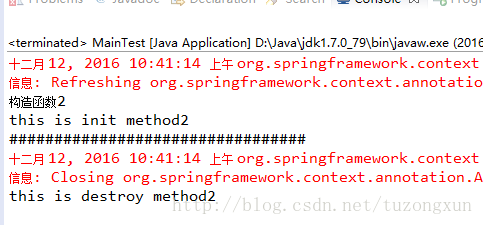
結(jié)果如下:
三、xml配置的方式:
這種方式實(shí)際上是和第一種對(duì)應(yīng)的,只不過(guò)細(xì)節(jié)上略有改變而已,首先,創(chuàng)建的java類(lèi)完全一樣:
package springTest2;public class Test3 { public void init() { System.out.println('this is init method3'); } public Test3() { super(); System.out.println('構(gòu)造函數(shù)3'); } public void destroy() { System.out.println('this is destroy method3'); } public void test() { System.out.println('testttttttt'); }}
不同的地方就在于,第一個(gè)例子中是使用注解告訴spring這個(gè)類(lèi)相當(dāng)于一個(gè)配置文件,而這里則是實(shí)實(shí)在在的配置文件spring.xml:
<?xml version='1.0' encoding='UTF-8'?> <beans xmlns='http://www.springframework.org/schema/beans' xmlns:xsi='http://www.w3.org/2001/XMLSchema-instance' xsi:schemaLocation='http://www.springframework.org/schema/beans http://www.springframework.org/schema/beans/spring-beans.xsd'> <bean init-method='init' destroy-method='destroy'></bean></beans>
這個(gè)配置大概也能算是spring.xml中最簡(jiǎn)單的一個(gè)配置了吧,除開(kāi)必要的文件頭,就只有一個(gè)bean,而且bean里邊也只有id,calss和init以及destroy方法。
因?yàn)楹?jiǎn)單,所以一目了然,id只是為了其他地方引用,class是指定這個(gè)bean對(duì)應(yīng)的類(lèi),而后邊兩個(gè)屬性則和用@Bean聲明時(shí)一模一樣。
因?yàn)檫@里聲明bean和指定兩個(gè)方法是用的xml配置,因此在測(cè)試的時(shí)候也就需要稍微有一點(diǎn)點(diǎn)改變:
package springTest2;import org.springframework.context.support.ClassPathXmlApplicationContext;public class MainTest { public static void main(String[] args) { ClassPathXmlApplicationContext context1 = new ClassPathXmlApplicationContext('spring.xml'); System.out.println('#################################'); context1.close(); }}
區(qū)別在于這里直接加載了配置文件,而不是java類(lèi),使用的是ClassPathxXmlApplicationContext而不是AnnotationConfigApplicationContext。
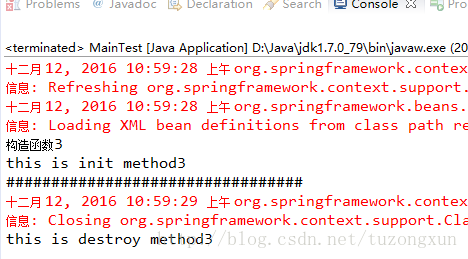
結(jié)果如下:
這里需要說(shuō)明的一點(diǎn)是,在實(shí)際的web應(yīng)用使用時(shí),可以在web.xml中使用類(lèi)似下邊的配置來(lái)加載bean,實(shí)現(xiàn)init method:
<servlet-name>dispatcher</servlet-name> <servlet-class>org.springframework.web.servlet.DispatcherServlet</servlet-class> <init-param> <param-name>contextConfigLocation</param-name> <param-value>classpath:spring.xml</param-value> </init-param> <load-on-startup>1</load-on-startup> </servlet> <servlet-mapping> <servlet-name>dispatcher</servlet-name> <url-pattern>/</url-pattern> </servlet-mapping>
然后啟動(dòng)tomcat結(jié)果如下:

這里邊沒(méi)有調(diào)用destroy method,原因是spring本身代碼就需要我們手動(dòng)調(diào)用銷(xiāo)毀bean的方法,像前邊的幾個(gè)例子中的context.close就是。
如果不手動(dòng)調(diào)用這個(gè)方法,bean就不會(huì)被銷(xiāo)毀,也就不會(huì)去調(diào)用destroy method,這也就是為何這里在web.xml中配置后,啟動(dòng)tomcat 只打印了構(gòu)造函數(shù)和init方法中的內(nèi)容。
例子都是很簡(jiǎn)單的,而通過(guò)簡(jiǎn)單的例子對(duì)比可能能更進(jìn)一步理解相關(guān)的知識(shí),理解了才能在實(shí)際應(yīng)用中更好的進(jìn)行選擇和集成。
到此這篇關(guān)于詳解java代碼中init method和destroy method的三種使用方式的文章就介紹到這了,更多相關(guān)java中init method和destroy method內(nèi)容請(qǐng)搜索好吧啦網(wǎng)以前的文章或繼續(xù)瀏覽下面的相關(guān)文章希望大家以后多多支持好吧啦網(wǎng)!
相關(guān)文章:
1. python爬蟲(chóng)實(shí)戰(zhàn)之制作屬于自己的一個(gè)IP代理模塊2. python 基于Appium控制多設(shè)備并行執(zhí)行3. python 實(shí)現(xiàn)圍棋游戲(純tkinter gui)4. Python加載數(shù)據(jù)的5種不同方式(收藏)6. .NET6打包部署到Windows Service的全過(guò)程7. .Net Core和RabbitMQ限制循環(huán)消費(fèi)的方法8. Python編寫(xiě)nmap掃描工具9. 解決ajax請(qǐng)求后臺(tái),有時(shí)收不到返回值的問(wèn)題10. HTML 絕對(duì)路徑與相對(duì)路徑概念詳細(xì)

 網(wǎng)公網(wǎng)安備