vue頁面引入three.js實現3d動畫場景操作
vue中安裝Three.js
近來無聊順便研究一些關于3D圖形化庫。three.js是JavaScript編寫的WebGL第三方庫。Three.js 是一款運行在瀏覽器中的 3D 引擎,你可以用它通過控制相機、視角、材質等相關屬性來創造大量3D動畫場景。
我們開始引入three.js相關插件。
1、首先利用淘寶鏡像,操作命令為:
cnpm install three
2.接下來利用npm安裝軌道控件插件:
關注我的微信公眾號【前端基礎教程從0開始】,加我微信,可以免費為您解答問題。回復“1”,拉你進程序員技術討論群。回復“小程序”,領取300個優秀的小程序開源代碼+一套入門教程。回復“領取資源”,領取300G前端,Java,微信小程序,Python等資源,讓我們一起學前端。
npm install three-orbit-controls
3.接下來安裝加載.obj和.mtl文件的插件:
npm i --save three-obj-mtl-loader
4.安裝渲染器插件:
npm i --save three-css2drender
5、安裝好以后,在頁面中引入three.js并使用,在所調用頁面引入的代碼為:
import * as Three from ‘three’
主要插件都已經安裝完成了,接下來可以實現一個demo,測試three.js是否引入成功。頁面測試代碼如下:
<template> <div> <div id='container'></div> </div></template><script> import * as Three from ’three’ export default { name: ’ThreeTest’, data () { return { camera: null, scene: null, renderer: null, mesh: null } }, methods: { init: function () { let container = document.getElementById(’container’) this.camera = new Three.PerspectiveCamera(70, container.clientWidth / container.clientHeight, 0.01, 10) this.camera.position.z = 0.6 this.scene = new Three.Scene() let geometry = new Three.BoxGeometry(0.2, 0.2, 0.2) let material = new Three.MeshNormalMaterial() this.mesh = new Three.Mesh(geometry, material) this.scene.add(this.mesh) this.renderer = new Three.WebGLRenderer({antialias: true}) this.renderer.setSize(container.clientWidth, container.clientHeight) container.appendChild(this.renderer.domElement) }, animate: function () { requestAnimationFrame(this.animate) this.mesh.rotation.x += 0.01 this.mesh.rotation.y += 0.02 this.renderer.render(this.scene, this.camera) } }, mounted () { this.init() this.animate() } }</script><style scoped> #container { height: 400px; }</style>
注意相關變量的定義容器大小的定義,接下來可以運行當前vue項目,并在瀏覽器中查看當前效果:
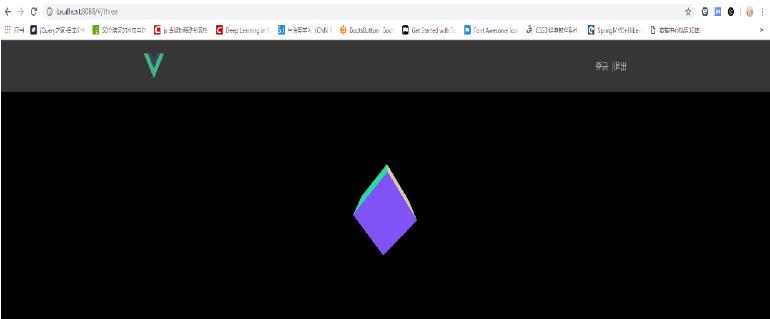
出來的效果是一個旋轉的正方形,這就表明當前項目已經成功引入three.js并可以運行,剩下的就可以創建場景,打造酷炫的3D效果。
補充知識:vue中three及其依賴引入和使用
官方文檔和例子[https://threejs.org/docs/index.html#manual/zh/introduction/Creating-a-scene]
引入
單頁面應用
<script src='http://www.intensediesel.com/lib/three.js'></script> //ES5,相關依賴相同
模塊化應用
npm 安裝
npm install three --save
我自己的是適用于require
const THREE=require(’three’) //或者
import * as THREE from ’three’
官方依賴
各種控制器,加載器,渲染相關先將文件放入相關文件夾都可以通過這種方法引入。也可以使用npm安裝,但在依賴多的情況下沒必要安裝。使用時同官方
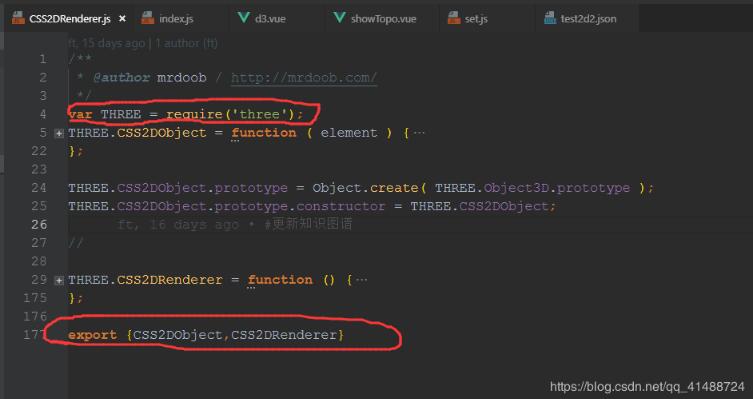
import {CSS2DObject,CSS2DRenderer} from ’../utils/THREE/CSS2DRenderer.js’;
== 需要注意應該先在該文件引入var THREE = require(‘three’); 因為文件中有對three的使用==
或者是
//官方依賴文檔jsm/controls/DragControls.js//引入需要的依賴import { EventDispatcher, Matrix4, Plane, Raycaster, Vector2, Vector3} from '@/build/three.module.js';....//最后一步始終是暴露出去export { DragControls };
相關插件
同樣通過npm install XXX安裝后,如精靈字體的three-spritetext,可以實現粗線條的three.meshline,以及常用的dat.gui插件
import SpriteText from ’three-spritetext’;var MeshLine = require(’three.meshline’); //包含了MeshLine,MeshLineMaterial//或者var {MeshLine,MeshLineMaterial} = require(’three.meshline’);
其外性能檢測插件Stats,不能通過npm 安裝,可以先下載stats.min.js。
使用:
1、修改為stats.js
2、該文件最后有一句'object' === typeof module && (module.exports = Stats);將其注釋
3、最后加上export default Stats
4、import Stats from ‘…/utils/THREE/stats.js’;
經常與stats一起使用的dat需要先通過npm安裝再使用
1、npm install dat.gui
2、var dat = require(“dat.gui”);
以上這篇vue頁面引入three.js實現3d動畫場景操作就是小編分享給大家的全部內容了,希望能給大家一個參考,也希望大家多多支持好吧啦網。
相關文章:

 網公網安備
網公網安備